基于RetinaNet训练模型以及检测图像中的对象
安装
Clone RetinaNet repository
1
$ git clone git@github.com:fizyr/keras-retinanet.git
使用虚拟环境
1
2
$ python -m venv .venv
$ .venv\Scripts\activate.bat安装包
1
2
3
4
$ pip install numpy
$ pip install tensorflow
$ pip install matplotlib
$ pip install .如果安装过程中出现错误,可能是墙的原因。可使用代理,例如:
1
$ pip install --proxy=http://127.0.0.1:7890 .
编译Cython代码
1
$ python setup.py build_ext --inplace
运行例子
下载RetinaNet模型 https://github.com/fizyr/keras-retinanet/releases ,选择 resnet50_coco_best_v2.1.0.h5
将下载好的文件放到snapshots文件夹下
运行examples目录下的例子
1
2
$ cd examples
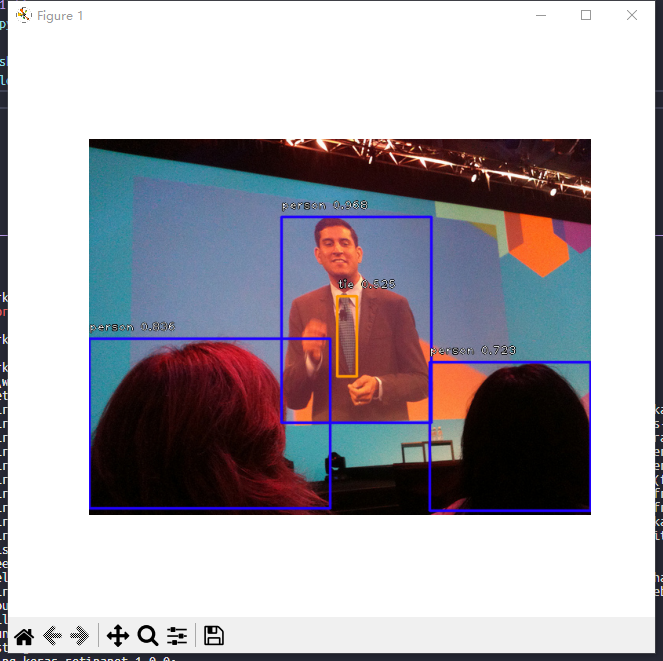
$ python resnet50_retinanet.py如果正常运行,你将看到一个包含检测结果的窗口
训练自定义数据
- 步骤 1 :准备数据
- 步骤 2: 标注
- 步骤 3 :定义 classes
- 步骤 4 :训练你自己的模型
准备数据
目录结构长这样:
1 | └── dataset |
将图片放在JPEGImages目录下
标注
使用LabelImg进行标注,保存格式选择 PASCAL VOC。
将生成的xml放在dataset\Annotations下。
定义Classes
修改 keras_retinanet/preprocessing/pascal_voc.py 文件中的voc_classes定义,例如
1 | voc_classes = { |
训练
使用下面的脚本生成train.txt 和 val.txt。
1 | from os import listdir |
生成后,train.txt中包含80%的图像,val.txt中包含20%的图像。
然后就可以开始训练了
1 | $ python keras_retinanet/bin/train.py |
训练完成后在snapshots目录下会生成一个新的h5后缀的文件。
将它转换成inference model:
1 | $ python keras_retinanet/bin/convert_model.py </path/to/training/model.h5> </path/to/save/inference/model.h5> |
也可以不进行转换,在代码中进行转换。
1 | model = models.load_model(model_path, backbone_name='resnet50') |
然后再修改examples\resnet50_retinanet.py中的labels_to_names和model_path,再进行验证。