使用ImageAI训练自定义模型以及检测图像中的对象
大概的步骤是:收集足够多的样本图片->人工标注出图片中的对象->训练出自定义模型->检测图片中的对象。
人工标注
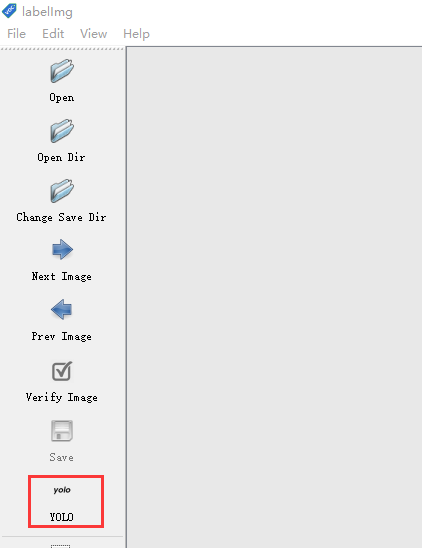
本文试验过程中使用了LabelImg进行人工标注。你可以在 https://github.com/tzutalin/labelImg 中找到编译好的可执行程序。
准备至少200张样本图片
ImageAI使用YOLO的标注格式,因此在用LabelImg进行标注时,记得选择YOLO格式
像下面这样创建目录结构
1
2
3
4
5
6
7
8
9
10
11
12
13
14
|--train\
| |--images\
| | |--1.png
| | |--2.png
| |--annotations\
| | |--1.txt
| | |--2.txt
|--validation\
| |--images\
| | |--1.png
| | |--2.png
| |--annotations\
| | |--1.txt
| | |--2.txt将70-80%的图片放到train\images下,剩余的放到validation\images\下。
将train\images的标注结果保存到train\annotations下,将validation\images的标注结果保存到validation\annotations下。
训练
下载预训练模型yolov3.pt
安装ImageAI, 本文试验是在Windows 10下使用venv进行安装的。
1
2
3
4
5
6
python -m venv .venv
.venv\Scripts\activate.bat
pip install -r requirements.txt
pip install -r requirements_gpu.txt
pip install -r requirements_extra.txt
pip install imageai --upgraderequirements.txt、requirements_gpu.txt、requirements_extra.txt可以在ImageAI中找到。
训练
1
2
3
4
5
6
7
8
9
from imageai.Detection.Custom import DetectionModelTrainer
trainer = DetectionModelTrainer()
trainer.setModelTypeAsYOLOv3()
trainer.setDataDirectory(data_directory="answer-sheet")
trainer.setTrainConfig(object_names_array=["t0", "t1", "t2", "t10"], batch_size=4, num_experiments=200, train_from_pretrained_model="yolov3.pt")
# In the above,when training for detecting multiple objects,
#set object_names_array=["object1", "object2", "object3",..."objectz"]
trainer.trainModel()- setDataDirectory设置数据目录,即包含train和validation的父目录
- object_names_array: 对象数组。
- batch_size: 该参数用于指定批次数量。由于内存限制,需要分批训练,直到所有批次训练集都完成为止。
- num_experiments: 该参数用于指定将对图像训练的次数,也称为epochs。
执行训练脚本后,如果看到类似下面的输出,表示正在正常训练中
1
2
3
4
5
6
7
8
Epoch 96/200
----------
Train:
40it [06:45, 10.13s/it]
box loss-> 0.08312, object loss-> 0.03558, class loss-> 0.00509
Validation:
20it [00:40, 2.04s/it]
recall: 0.691667 precision: 0.403712 mAP@0.5: 0.465307, mAP@0.5-0.95: 0.162056训练完成后会生成类似下面的结果

检测
运行下面的脚本
1
2
3
4
5
6
7
8
9
10
from imageai.Detection.Custom import CustomObjectDetection
detector = CustomObjectDetection()
detector.setModelTypeAsYOLOv3()
detector.setModelPath("answer-sheet/models/yolov3_answer-sheet_mAP-0.65715_epoch-191.pt")
detector.setJsonPath("answer-sheet/json/answer-sheet_yolov3_detection_config.json")
detector.loadModel()
detections = detector.detectObjectsFromImage(input_image="1.png", output_image_path="1-detected.png")
for detection in detections:
print(detection["name"], " : ", detection["percentage_probability"], " : ", detection["box_points"])可以在1-detected.png中看到对1.png图片中的对象检测结果。
也可以将各个检测到的对象单独裁剪出来
1
2
3
4
5
6
7
8
9
10
11
12
13
from imageai.Detection.Custom import CustomObjectDetection
detector = CustomObjectDetection()
detector.setModelTypeAsYOLOv3()
detector.setModelPath("answer-sheet/models/yolov3_answer-sheet_mAP-0.65715_epoch-191.pt")
detector.setJsonPath("answer-sheet/json/answer-sheet_yolov3_detection_config.json")
detector.loadModel()
detections, extracted_objects_array = detector.detectObjectsFromImage(input_image="1.png", output_image_path="1-detected.png", extract_detected_objects=True)
for detection, object_path in zip(detections, extracted_objects_array):
print(object_path)
print(detection["name"], " : ", detection["percentage_probability"], " : ", detection["box_points"])
print("---------------")裁剪出来的子图片保存在1-detected-extracted子目录中。